In this tutorial, we are going to explain in step-by-step detail how to install Collabora Online on Ubuntu 22.04 OS.
Collabora Online is an open-source office built on LibreOffice Technology. It provides many features and one of the most useful is that Collabora provides real-time editing of Word documents, spreadsheets, presentations and etc.
We assume that you have a working instance of Nextcloud with the LAMPS stack since the Collabora must be integrated with it. If you do not know how to install it, please check our blog post about installing Nextcloud on Ubuntu 22.04.
Installing Collabora Online and integrating with Nextcloud is a straightforward process that may take up to 20 minutes. Let’s get started!
Table of Contents
Prerequisites
- A server with Ubuntu 22.04 as OS
- User privileges: root or non-root user with sudo privileges
- A valid domain pointed to your server IP address
Step 1. Update the System
Before we install the Collabora Online service, we will update the system packages to the latest versions available.
sudo apt update -y && sudo apt upgrade -y
Step 2. Install Collabora Online
First, we will install some prerequisites:
sudo apt install apt-transport-https ca-certificates
Once done, add the Collabora key and repository because it does not exist in the official Ubuntu 22.04 repo.
 cd /usr/share/keyrings

sudo wget https://collaboraoffice.com/downloads/gpg/collaboraonline-release-keyring.gpg
The key is added, now create the following file with the command below:
touch /etc/apt/sources.list.d/collaboraonline.sources
Open this file with your favorite editor and paste the following lines of code:
Types: deb
URIs: https://www.collaboraoffice.com/repos/CollaboraOnline/CODE-ubuntu2004
Suites: ./
Signed-By: /usr/share/keyrings/collaboraonline-release-keyring.gpg
Save the file, close it, update the system and install the Collabora Online service.
sudo apt update -y

sudo apt install coolwsd code-brand -y
After installation, start and enable the Collabora coolwsd service.
sudo systemctl start coolwsd && sudo systemctl enable coolwsd
To check the status of the service, execute the following command:
sudo systemctl status coolwsd
You should get the following output:
root@host:~# systemctl status coolwsd
● coolwsd.service - Collabora Online WebSocket Daemon
     Loaded: loaded (/lib/systemd/system/coolwsd.service; enabled; vendor preset: enabled)
     Active: active (running) since Thu 2023-06-22 06:27:10 CDT; 399ms ago
   Main PID: 3995 (coolwsd)
      Tasks: 1 (limit: 4557)
     Memory: 1.1M
        CPU: 390ms
     CGroup: /system.slice/coolwsd.service
             └─3995 /usr/bin/coolwsd --version --o:sys_template_path=/opt/cool/systemplate --o:child_root_path=/opt/cool/child-roots --o:file_server_root_path=/usr/sha>

Jun 22 06:27:10 host.test.vps systemd[1]: Started Collabora Online WebSocket Daemon.
Before we connect Collabora with the NextCloud instance, we need to execute the following commands:
sudo coolconfig set ssl.enable false

sudo coolconfig set ssl.termination true
The commands above are for disabling the TLS because the service is not able to find the certificate file. We will enable these two settings later.
Next is to allow connection to your existing Nextcloud instance, using the Nextcloud domain with the following command:
sudo coolconfig set storage.wopi.host YourNextCloudDomain
After executing the command, you should receive the following output:
root@host:~# sudo coolconfig set storage.wopi.host YourNextCloudDomain
No property, "storage.wopi.host", found in config file.
Adding it as new with value: "YourNextCloudDomain"
Saving configuration to : /etc/coolwsd/coolwsd.xml ...
Saved
Once done, set Collabora Online admin password:
sudo coolconfig set-admin-password
You should enter the admin username and strong password.
root@host:~# sudo coolconfig set-admin-password
Enter admin username [admin]: admin
Enter admin password:
Confirm admin password:
Saving configuration to : /etc/coolwsd/coolwsd.xml ...
Saved
Restart the Collabora service after any changes in /etc/coolwsd/coolwsd.xml
sudo systemctl restart coolwsd
Step 3. Configure Apache as a Reverse Proxy
Finally, when Collabora Online is installed, and everything is OK with the service, we can configure the reverse proxy. Additional info about this is that the Collabora service is running on port 9980. To check this, execute the following command:
root@host:~# netstat -tunlp | grep 9980
You should get the following output:
root@host:~# netstat -tunlp | grep 9980
tcp6       0      0 :::9980                 :::*                    LISTEN      8310/coolwsd
Create the Apache virtual host file:
touch /etc/apache2/sites-available/collabora.conf
Open it with your favorite editor, and paste the following lines of code:
 <VirtualHost *:80>
 ServerName collabora.yourdomain.com
 AllowEncodedSlashes NoDecode
 ProxyPreserveHost On


 # static html, js, images, etc. served from coolwsd
 # browser is the client part of Collabora Online
 ProxyPass           /browser http://127.0.0.1:9980/browser retry=0
 ProxyPassReverse    /browser http://127.0.0.1:9980/browser


 # WOPI discovery URL
 ProxyPass           /hosting/discovery http://127.0.0.1:9980/hosting/discovery retry=0
 ProxyPassReverse    /hosting/discovery http://127.0.0.1:9980/hosting/discovery


 # Capabilities
 ProxyPass           /hosting/capabilities http://127.0.0.1:9980/hosting/capabilities retry=0
 ProxyPassReverse    /hosting/capabilities http://127.0.0.1:9980/hosting/capabilities


 # Main websocket
 ProxyPassMatch      "/cool/(.*)/ws$"      ws://127.0.0.1:9980/cool/$1/ws nocanon


 # Admin Console websocket
 ProxyPass           /cool/adminws ws://127.0.0.1:9980/cool/adminws


 # Download as, Fullscreen presentation and Image upload operations
 ProxyPass           /cool http://127.0.0.1:9980/cool
 ProxyPassReverse    /cool http://127.0.0.1:9980/cool
 # Compatibility with integrations that use the /lool/convert-to endpoint
 ProxyPass           /lool http://127.0.0.1:9980/cool
 ProxyPassReverse    /lool http://127.0.0.1:9980/cool
</VirtualHost>
Save the file and close it. After that, enable the website and the proxy modules:
sudo a2ensite collabora.conf

sudo a2enmod proxy proxy_http proxy_wstunnel
Check the Apache syntax:
apachectl -t
You should get the following output:
root@host:~# apachectl -t
Syntax OK
Now, you can restart the Apache service.
sudo systemctl restart apache2
Step 4. Install the Let’s Encrypt certificate
To install certbot, execute the following command:
sudo apt install certbot python3-certbot-apache -y
Now, to install the SSL certificate, simply execute the following command:
sudo certbot --apache
Add admin email, agree on the terms and conditions, and choose the right domain, or you can leave the input empty and certbot will install Let’s Encrypt on all domains on your server.
Step 5. Integrate Collabora with NextCloud
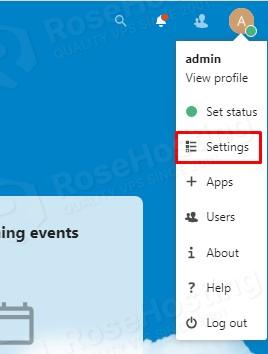
This tutorial’s last step is integrating Collabora with the existing NextCloud instance. Log in to your NextCloud instance and navigate to the settings section

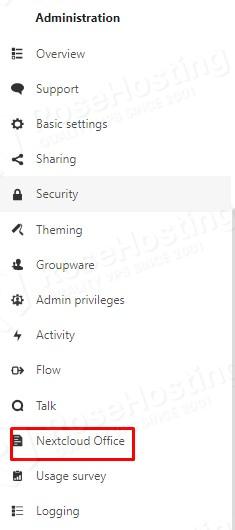
From the Administration menu on the left, click on NextCloud Office

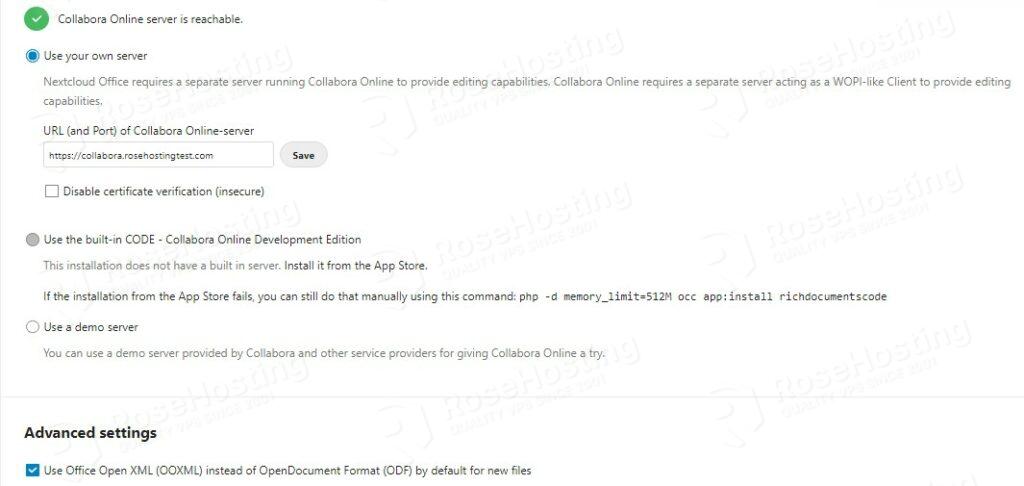
Then select Use your own server and enter your Collabora URL. From the Advanced menu, select the checkbox for OpenXML files.

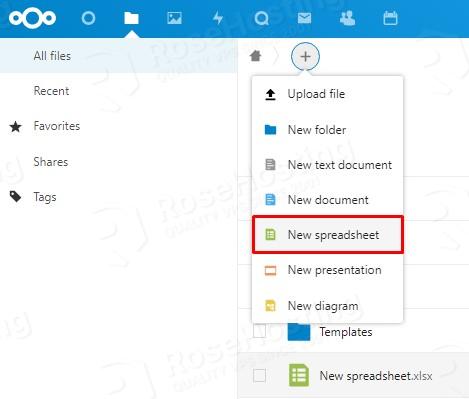
Now, we can create a new spreadsheet and start to use it.


Congratulations! You successfully installed and integrated Collabora Online with NextCloud on Ubuntu 22.04. If you find it difficult to install, you can always contact our technical support, and they will do the rest for you. We are available 24/7.
If you liked this post on how to integrate Collabora Online on Ubuntu 22.04, please share it with your friends on the social networks using the buttons on the left or simply leave a reply below. Thanks.
Hi, nice tutorial! :) Can you add the settings for nginx? I don’t use apache :-/ Best regards