Rocket.Chat is a self-hosted and open source web chat server. It offers a chat, file sharing, video calls, helpdesk and voice services which makes it a great alternative to Slack. This tutorial provides step-by-step instructions for installing Rocket.Chat on an Ubuntu 16.04 VPS.
Rocket.Chat comes with tons of useful features, such as:
– Public and private channels
– Live chat / Messaging call center / Audio Calls
– Different APIs
– File Upload and sharing
– Remote Video Monitoring
– Custom emojis, sounds, and company assets
– Android, iOS, Windows, Mac, Linux, and web applications
and many more…
Prerequisites
The following prerequisites need to be met in order to install and run Rocket.Chat
– It is recommended to have at least 2 GB of memory for Rocket.Chat, so we will use our SSD 2 VPS hosting plan
– SSH root access which comes by default with all our VPS hosting plans
– Node.js – JavaScript run-time environment
– MongoDB database server
– GraphicsMagick and curl
Step 1: Login via SSH and update the server
Login to your Ubuntu 16.04 VPS via SSH as user root
ssh root@IP_Address
Before we start with the installation, make sure that all installed packages are updated to the latest version
apt update && apt upgrade
Step 2: Install MongoDB database server
Rocket.Chat requires a MongoDB database, so we will have to install MongoDB database server. It can be installed from the official Ubuntu repositories using the apt package manager, but it is not the latest version maintained by the MongoDB team. MongoDB has their own repositories and provides the latest version of the database server.
In order to install MongoDB from their official released packages, we will have to import the MongoDB public key as shown below
apt-key adv --keyserver hkp://keyserver.ubuntu.com:80 --recv 9DA31620334BD75D9DCB49F368818C72E52529D4
Once the key is added, we can proceed and add the official MongoDB repository
echo "deb http://repo.mongodb.org/apt/ubuntu trusty/mongodb-org/4.0 multiverse" | sudo tee /etc/apt/sources.list.d/mongodb-org-4.0.list
And finally, update the local package database and install MongoDB and its dependencies
apt update
apt install -y mongodb-org curl graphicsmagick
You can check the version of MongoDB using the following command
mongo -version
MongoDB shell version v4.0.1
In order to start MongoDB as a service, we will create a unit file with the following content
nano /etc/systemd/system/mongodb.service

[Unit]
Description=High-performance, schema-free document-oriented database
After=network.target

[Service]
User=mongodb
ExecStart=/usr/bin/mongod --quiet --config /etc/mongod.conf

[Install]
WantedBy=multi-user.target
Save the file, start the MongoDB server and enable it to start upon server restart
systemctl start mongodb
systemctl enable mongodb
Step 3: Install Node.js and npm
Next, we will install Node.js and npm package manager on the server. Run the following command
apt -y install npm nodejs
We will also need to install build-essential in order to install some npm packages
apt -y install build-essential
It is recommended to use Node.js version 8.9.3 in order to run Rocket.Chat . We will install a tool simply called ‘n’ so we can change the Node.js version.
npm install -g n
Run the following command to install Node.js version 8.9.3
n 8.9.3
Output:
     install : node-v8.9.3
       mkdir : /usr/local/n/versions/node/8.9.3
       fetch : https://nodejs.org/dist/v8.9.3/node-v8.9.3-linux-x64.tar.gz
######################################################################## 100.0%
   installed : v8.9.3
To confirm that the installed version is 8.9.3 you can run the following command
node --version
v8.9.3
Step 4: Install Rocket.Chat
Go to Rocket.Chat’s official website and download the latest stable release of the application
cd /opt
curl -L https://releases.rocket.chat/latest/download -o rocket.chat.tgz
Unpack the downloaded archive
tar zxvf rocket.chat.tgz
The content of the application will be stored in a new directory named ‘bundle’. We will rename the directory
mv bundle rocketchat
Next, install all necessary packages listed in the packages.json file provided by Rocket.Chat
cd rocketckat/programs/server
npm install
Set the environment variables accordingly and start Rocket.Chat by executing the following commands
cd /opt/rocketckat/
export ROOT_URL=http://domain.com:3000/
export MONGO_URL=mongodb://localhost:27017/rocketchat
export PORT=3000

node main.js
Step 5: Verify Rocket.Chat installation and finalize the installation vie web browser
If Rocket.Chat is successfully started you should get the following output
➔ +----------------------------------------------------+
➔ |                   SERVER RUNNING                   |
➔ +----------------------------------------------------+
➔ |                                                    |
➔ |  Rocket.Chat Version: 0.68.5                       |
➔ |       NodeJS Version: 8.9.3 - x64                  |
➔ |             Platform: linux                        |
➔ |         Process Port: 3000                         |
➔ |             Site URL: http://domain.com:3000/  		|
➔ |     ReplicaSet OpLog: Disabled                     |
➔ |          Commit Hash: e412d018f8                   |
➔ |        Commit Branch: HEAD                         |
➔ |                                                    |
➔ +----------------------------------------------------+
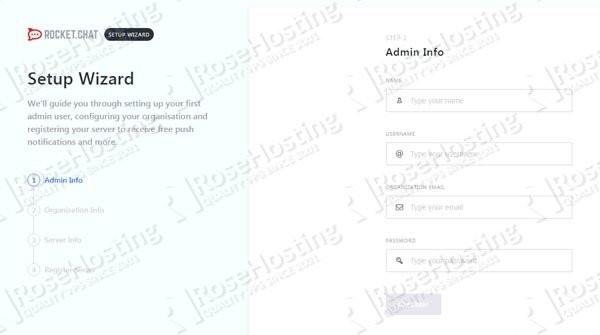
And you will be able to access Rocket.Chat setup wizard with your favorite web browser at http://domain.com:3000/
where you can create your administrative account and configure Rocket.Chat according to your needs. For more information on how to use and configure Rocket.Chat please check their official documentation.
Of course, you don’t have to install Rocket.Chat on Ubuntu 16.04, if you use one of our Managed Ubuntu Hosting plans, in which case you can simply ask our expert Linux admins to install Rocket.Chat on Ubuntu 16.04 for you. They are available 24×7 and will take care of your request immediately.
PS. If you liked this post on how to install Rocket.Chat on Ubuntu 16.04, please share it with your friends on the social networks using the buttons on the left or simply leave a reply below. Thanks.

