What exactly is Piwigo?
It is open-source photo gallery software for the web, built by an active community of users and developers. Piwigo extensions make it easily customizable and highly flexible. Piwigo is free and open source software.
Before you start with the installation of Piwigo, make sure you are in a screen session and your Ubuntu VPS is up-to-date by running:
## screen -U -s piwigo-screen
## apt-get update
## apt-get upgrade
Piwigo requires a webserver, a database server and a PHP server/support on your linux virtual server. So, let’s set-up LAMP (Linux Apache MySQL and PHP) on the system.
Install Apache2 on your Ubuntu 14.04 VPS using:
## apt-get install apache2
Next, proceed with installing the MySQL database server in your system using
## apt-get install mysql-server
once installed, run the post-installation script mysql_secure_installation and configure it like this
## mysql_secure_installation

- Set root password? [Y/n] y
- Remove anonymous users? [Y/n] y
- Disallow root login remotely? [Y/n] y
- Remove test database and access to it? [Y/n] y
- Reload privilege tables now? [Y/n] y
install PHP support on the system using the following command:
## apt-get install php5 php5-mysql
check it out using
## php -v
install GD PHP support in case it’s not already installed on the system
## apt-get install php5-gd
Install Piwigo in /var/www/html/gallery
## wget "http://piwigo.org/download/dlcounter.php?code=latest" -O /tmp/piwigo-gallery.zip
## unzip /tmp/piwigo-gallery.zip -d /var/www/html
## mv /var/www/html/piwigo /var/www/html/gallery
## cd /var/www/html/gallery
## chown www-data: -R ../gallery/
create a new MySQL database for Piwigo using MySQL command line or any other tool like phpMyAdmin. Using command line, this can be achieved by running the following SQL statements:
## mysql -u root -p

mysql> CREATE DATABASE piwigo;
mysql> GRANT ALL ON piwigo.* TO piwigo@localhost IDENTIFIED BY 'OkMT2gW9nT';
mysql> \q
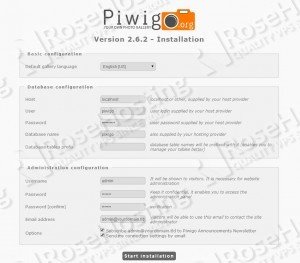
once the database is created, navigate to http://yourdomain.tld/gallery/ and set-up your Piwigo as shown on the screenshot below:
that’s it.
Of course you don’t have to do any of this if you use one of our Linux VPS Hosting services, in which case you can simply ask our expert Linux admins to install Piwigo for you. They are available 24×7 and will take care of your request immediately.
PS. If you liked this post please share it with your friends on the social networks using the buttons on the left or simply leave a reply below. Thanks.

How can i let other users to access my piwigo website? i am using linux for my program.
You should edit your /etc/apache2/sites-enabled/000-default.conf file and change “Document Root /var/www/html” to “Document Root /var/www/html/gallery” .
Of course you should also modify the line “ServerName” and add your domain there.