Operating systems all now provide support for almost all languages and locales. Due to the widespread use of servers and computers all over the world, creating support for languages other than English was inevitable. Whether it’s for personal or professional use, millions of people need their computers or servers to provide output in a language they can understand, or in units that are relevant to their region.
Language-specific aspects of the server include being able to display language-specific characters, date and time formats specific to the region, and any other formatting changes, such as conventions/standards used for numbers and units.
In this tutorial, we will not only show you how to change the locale to whatever locale you need, but we will also show you various commands that allow you to see your installed locales, install additional locales, and more.
Table of Contents
Checking the current locale in Ubuntu
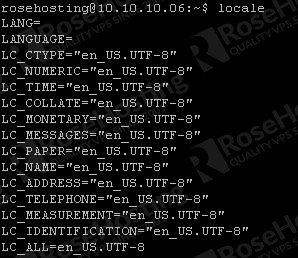
By entering this command, you can see which locales are currently being used for your active terminal session:
locale
You can have several locales set for different parts of your system.
Changing your locale
We will be covering two methods of changing your locale: manually, or by using the “update-locale” command. If you wish to change your locale with either method, you will still need to see which locales are currently installed on your system beforehand. Luckily, there is a command for this. Execute this next command to output the currently installed locales:
locale -a
Here’s some example output:
C
de_DE.utf8
de_CH.utf8
fr_CH.utf8
fr_CA.utf8
en_US.utf8
POSIX
By doing this, you now know which locales are ready to enable on your system. If you need to install additional locales, you can scroll down to the “Extra commands and features” section of the tutorial.
Changing your locale manually
Editing the locale file is very easy. Just use your favorite text editor to edit the file at the location /etc/default/locale. If this ‘locale’ file does not exist, then no locale is currently set for your system. If no file exists, you can create one manually and enable a locale for your system. Here’s an example of what that kind of file would look like:
LANG="en_US.UTF-8"
Replace “en_US.UTF-8” with whichever locale you wish to have as active. Once you save the file, you then need to log out then log back in, or open a new terminal, and your newly chosen locale will be the active locale.
NOTE: This example file only sets the “lang” variable for your system, which covers the locale for all parts of the system. If you need a different locale for specific parts of the system, you can see the “Extra commands and features” section down below.
Changing your locale using the “update-locale” command
This is similar to the other method, but by using the “update-locale” command, we can easily update the file without having to edit it ourselves. Execute it as shown to change your locale:
sudo update-locale LANG=<name of locale here>
Then restart your terminal, or log out then back in, and your newly-set locale will be active.
Extra commands and features
Adding additional locales
If your server or computer doesn’t have a locale that you need, it can simply be generated by using the “locale-gen” command. Just run the following command to generate a locale for the region you need:
sudo locale-gen <name of locale here>

sudo locale-gen <name of locale here>.UTF-8
(you can pick either one, it depends on whether or not you need UTF-8 encoding)
Then update your locale to add the generated locale to the list of installed locales (this will not make it an active locale):
sudo update-locale
Changing the locale for specific parts of the operating system
While setting the “lang” variable allows you to change the locale for the entire system all at once, that might not be what you want. Maybe you need system messages to be in English, but the time and date need to be in a European format. Luckily, that and a lot more is all possible.
There is a list of variables that you can set individually by using either method shown earlier. If you change your locale by editing the file, then just add the value to a new line for each new value. And when setting them using the command, just append the other values to the end of the command. The only thing that needs to be changed is the variable name – you still use the locale name as you did with the “lang” variable. Here are a few useful variables to know:
- LC_MESSAGES – Sets the language for system messages.
- LC_RESPONSE – Sets the language for dialogs shown on screen (e.g. “Yes” or “No” dialogs).
- LC_NUMERIC – Sets the format for numbers depending on the region (e.g. decimals and commas being switched in some countries).
- LC_TIME – Sets the format for the time and date.
- LC_COLLATE – Sets the alphabetical order for strings (e.g. file names).
- LC_MONETARY – Sets the currency name and symbol depending on the country.
- LC_NAME – Sets the format for names (e.g. last name displayed before the first name).
There are several more that can be found online, but these are most likely to be used.
See Also: How to Set Up System Locale on CentOS 7

P.S. If you liked this post, feel free to share it with your friends by using the social media share shortcuts, or simply leave a comment below. Thanks.

