A static or fixed IP address is an IP address that does not change. Whether you reboot your device or home router, your device with a static IP address will get the same IP address. The opposite of a static IP address is the dynamic IP address. A device that does not have a static IP address will get a dynamic IP address assigned by the DHCP (Dynamic Host Configuration Protocol) server, and it may change from time to time.

By default, a device connected to your home router whether it’s using cable or connected through WiFi will most likely get a dynamic IP address. And, if you use your managed Ubuntu VPS also as an FTP server of web server you would want to configure a static IP address for it, so you can reach the server using the same IP address. In this tutorial, we will show you how to configure a static IP address on Ubuntu 20.04.
Configure Static IP Address on Ubuntu Server 20.04
In Ubuntu server 20.04, the network configuration is managed by a utility called NetPlan. NetPlan is a new network configuration tool introduced in Ubuntu 17.10 to manage network settings. And during the Ubuntu 20.04 server installation, cloud-init will configure a dynamic IP address for the network interface on the server if the DHCP server is available.
First of all, we need to check what is the ethernet interface card that we want to configure the IP address for, we can run ip a or ip link command to see it. In this example, the interface that we are going to configure the static IP is ‘ens33’.

To proceed with configuring a static IP address on Ubuntu server 20.04, we have to make sure that cloud-init does not manage the network interface. To do it, let’s open cloud-init file at /etc/cloud/cloud.cfg.d/subiquity-disable-cloudinit-networking.cfg and make sure that “network: {config: disabled}” entry is there. If the entry is missing, we have to create it.
master@ubuntu20:~$ sudo cat /etc/cloud/cloud.cfg.d/subiquity-disable-cloudinit-networking.cfg
network: {config: disabled}
Now, to configure a static IP address, we need to modify the YAML configuration file at /etc/netplan/00-installer-config.yaml. Please note, when editing a YAML file, make sure you follow the YAML code indentation standards. The suggested syntax for YAML files is to use 2 spaces for indentation, do not use TABS. If the indentation and syntax are incorrect, the changes will not work.

$ sudo cat /etc/netplan/00-installer-config.yaml
# This is the network config written by 'subiquity'
network:
  ethernets:
    ens33:
      dhcp4: true
  version: 2
As seen in the file, DHCP is available and the server is getting the IP address from the DHCP server. To change your server IP address, for example to 192.168.1.100, let’s back up the file /etc/netplan/00-installer-config.yaml
$ sudo cp -a /etc/netplan/00-installer-config.yaml{,.orig}
and open the file
$ sudo nano /etc/netplan/00-installer-config.yaml
to replace the content of /etc/netplan/00-installer-config.yaml above with these lines.
network:
  ethernets:
    ens33:
      addresses: [192.168.1.100/24]
      gateway4: 192.168.1.1
      nameservers:
        addresses: [192.168.1.1, 8.8.8.8]
  version: 2
When editing the file, make sure the ethernet interface match with the one we see when invoking the ‘ip a’ or ‘ip link’ command.
To check the new configuration file without applying the changes, we can run this command:
$ sudo netplan try
If everything is okay, you will see a message as seen in the picture below. You can hit ENTER to accept the changes or leave it to revert the changes back to the previous configuration.

Configure Static IP Address on Ubuntu Desktop 20.04
Most modern home routers have configuration options to allow you to reserve an IP address for a specific device connected to the same network. With this option in your home router, your devices on the network will get static/fixed IP addresses. This is the easiest and most recommended way to assign an IP address to your device, and this is called static DHCP or DHCP reservation.
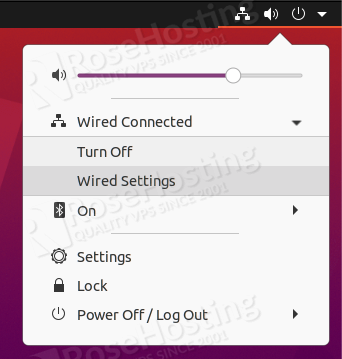
If you do not want to configure it on the router, you can do it on the device itself. At this moment, we will show you how to configure a static IP address on Ubuntu desktop 20.04. Let’s click on the network icon on the top right of your screen.

Clicking the icon will bring you to the new window, as seen in the picture below

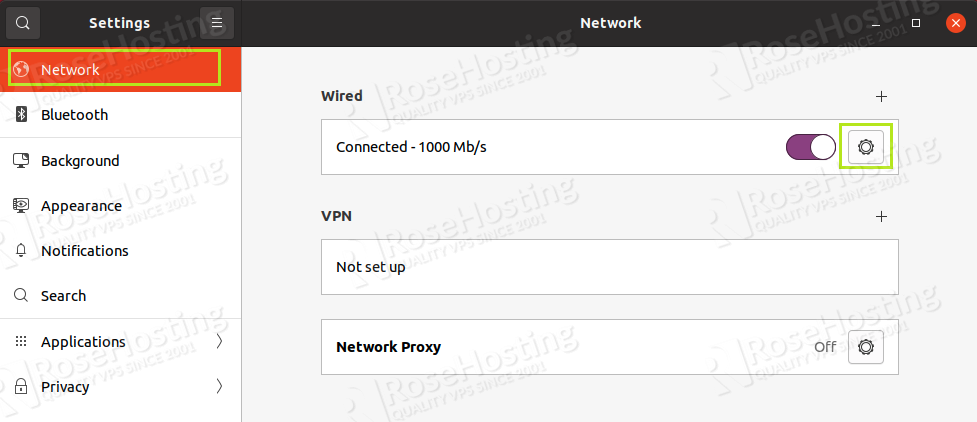
In this example, we will configure the static IP address for the wired connection. So, we need to click on the cog icon next to the on-off slider in the wired connection section. To configure your WiFi connection, then you need to click on the cog icon in the WiFi connection section.
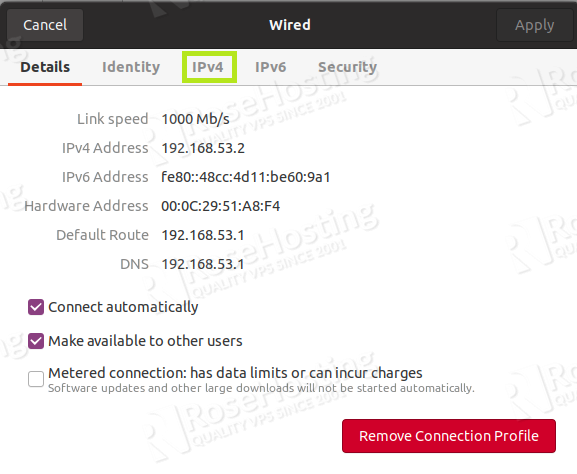
This will open a new window, click on the IPv4 as shown in the picture below

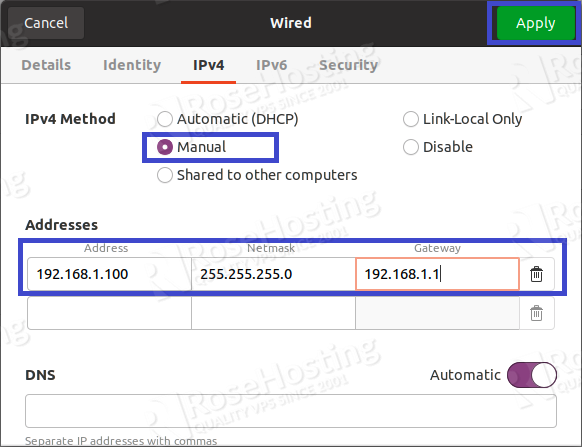
In the next window, choose “Manual” in IPv4 Method and fill the following information in the forms
Address: 192.168.1.100
Netmask: 255.255.255.0
Gateway: 192.168.1.1

You can leave the DNS part blank if you want to set it to automatic or use your own DNS address, separate the IP addresses with commas, for example, 1.1.1.1, 8.8.8.8, then click on the APPLY button above.
Congratulations! you have successfully configured a static IP address on Ubuntu 20.04.
Of course, you don’t need to configure a static IP address on Ubuntu 20.04 yourself if you use one of our Linux VPS Hosting services and have additional IP addresses. In which case you can simply ask our expert Linux admins to configure and set this up for you. They are available 24×7 and will take care of your request immediately.
PS. If you liked this post on How To Configure a Static IP Address on Ubuntu 20.04, please share it with your friends on social networks, or simply leave a reply below. Thanks.