In this tutorial, we are going to explain how to install Joomla on AlmaLinux OS.
Joomla is a free and open-source content management system (CMS) written in PHP and used for creating websites. Joomla offers a variety of features such as caching, blogs, support for different languages and etc. The data is stored in the MySQL database. In this tutorial, we will install Joomla with the LAMP stack.
Installing Joomla on AlmaLinux is a straightforward process and may take up to 15 minutes. Let’s get started!
Table of Contents
Prerequisites
- A server with AlmaLinux 9 as OS
- Valid domain pointed to the servers IP address
- User privileges: root or non-root user with sudo privileges
Step 1. Update the System
Before we start installing the LAMP stack, we will update the system packages to the latest version available.
sudo dnf update -y && sudo dnf upgrade -y
Step 2. Install LAMP stack
We will start with installing the Apache web server. To do that, execute the following command:
sudo dnf install httpd -y
Once installed, start and enable the service.
sudo systemctl enable httpd && sudo systemctl start httpd
Check if the service is up and running:
sudo systemctl status httpd
You should receive the following output:
[root@host ~]# sudo systemctl status httpd
● httpd.service - The Apache HTTP Server
     Loaded: loaded (/usr/lib/systemd/system/httpd.service; enabled; vendor preset: disabled)
     Active: active (running) since Tue 2023-01-10 06:15:21 CST; 2 days ago
       Docs: man:httpd.service(8)
   Main PID: 555 (httpd)
     Status: "Total requests: 200; Idle/Busy workers 100/0;Requests/sec: 0.000988; Bytes served/sec:   2 B/sec"
      Tasks: 278 (limit: 24796)
     Memory: 53.8M
        CPU: 3min 8.276s
     CGroup: /system.slice/httpd.service
             ├─ 555 /usr/sbin/httpd -DFOREGROUND
             ├─ 569 /usr/sbin/httpd -DFOREGROUND
             ├─ 570 /usr/sbin/httpd -DFOREGROUND
             ├─ 571 /usr/sbin/httpd -DFOREGROUND
             ├─ 572 /usr/sbin/httpd -DFOREGROUND
             └─1420 /usr/sbin/httpd -DFOREGROUND

Jan 10 06:15:21 host.test.vps systemd[1]: Starting The Apache HTTP Server...
Jan 10 06:15:21 host.test.vps httpd[555]: Server configured, listening on: port 80
Jan 10 06:15:21 host.test.vps systemd[1]: Started The Apache HTTP Server.
The second of the LAMP stack will be the PHP8 with its extensions. Execute the following command to install the PHP8:
sudo dnf install php php-cli php-fpm php-curl php-mysqlnd php-gd php-readline php-mbstring php-apcu php-xml php-dom php-opcache php-zip php-intl php-common php-bcmath php-json -y
Once installed, check the installed PHP version by executing the php -v on your command line. You should receive the following output:
[root@host ~]# php -v
PHP 8.0.20 (cli) (built: Jun  8 2022 00:33:06) ( NTS gcc x86_64 )
Copyright (c) The PHP Group
Zend Engine v4.0.20, Copyright (c) Zend Technologies
    with Zend OPcache v8.0.20, Copyright (c), by Zend Technologies
The final installation of the LAMP stack is the MySQL service. To install the MySQL server execute the following command:
sudo dnf install mysql-server mysql -y
Start and enable the mysqld.service with the following commands:
sudo systemctl start mysqld && sudo systemctl enable mysqld
Check the status of the mysqld.service
sudo systemctl status mysqld
You should receive the following output:
[root@host ~]# sudo systemctl status mysqld
● mysqld.service - MySQL 8.0 database server
     Loaded: loaded (/usr/lib/systemd/system/mysqld.service; enabled; vendor preset: disabled)
     Active: active (running) since Thu 2023-01-12 14:35:00 CST; 4s ago
   Main PID: 3666 (mysqld)
     Status: "Server is operational"
      Tasks: 39 (limit: 24796)
     Memory: 456.4M
        CPU: 10.492s
     CGroup: /system.slice/mysqld.service
             └─3666 /usr/libexec/mysqld --basedir=/usr

Jan 12 14:34:46 host.test.vps systemd[1]: Starting MySQL 8.0 database server...
Jan 12 14:34:46 host.test.vps mysql-prepare-db-dir[3584]: Initializing MySQL database
Jan 12 14:35:00 host.test.vps systemd[1]: Started MySQL 8.0 database server.
Step 3. Create a Joomla database and user
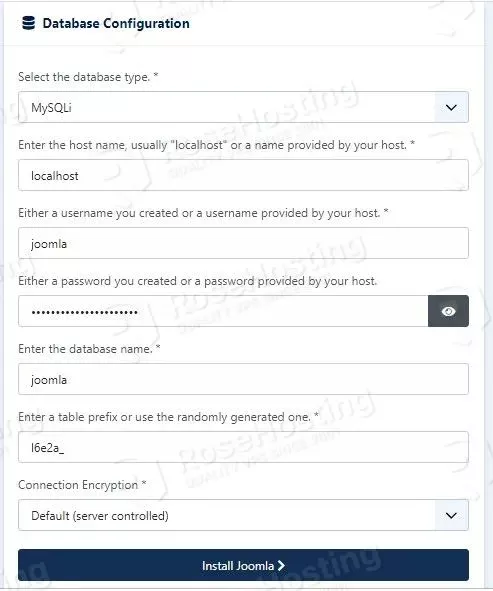
To create a MySQL database, database user and grant permissions to that user, log in to MySQL with the mysql command in your console and execute the commands below:
CREATE DATABASE joomla;
CREATE USER 'joomla'@'localhost' IDENTIFIED BY 'YourStrongPasswordHere';
GRANT ALL PRIVILEGES ON joomla.* TO 'joomla'@'localhost';
FLUSH PRIVILEGES;
exit;
Step 4. Download and install Joomla
To download the latest version of Joomla, go into the document root of the Apache web server. Execute the following commands:
cd /var/www/html

wget https://downloads.joomla.org/cms/joomla4/4-2-6/Joomla_4-2-6-Stable-Full_Package.zip
unzip Joomla_4-2-6-Stable-Full_Package.zip

rm Joomla_4-2-6-Stable-Full_Package.zip
Set the files and folders permissions with the following command:
sudo chown -R apache:apache /var/www/html/

sudo chmod -R 775 /var/www/html/
Step 5. Create Apache Virtual Host File
We need to create an Apache virtual host configuration file in order can access Apache via the domain name:
sudo nano /etc/httpd/conf.d/joomla.conf
Paste the following lines of code:
<VirtualHost *:80>
     ServerName yourdomain.com
     DocumentRoot /var/www/html/
     <Directory /var/www/html/>
          Options FollowSymlinks
          AllowOverride All
          Require all granted
     </Directory>

     ErrorLog /var/log/httpd/yourdomain.com_error.log
     CustomLog /var/log/httpd/yourdomain.com.log combined
</VirtualHost>
Save the file, close it check the syntax of the Apache configuration file.
httpd -t
You should get this output:
[root@host project]# httpd -t
Syntax OK
Restart the httpd.service.
sudo systemctl restart httpd
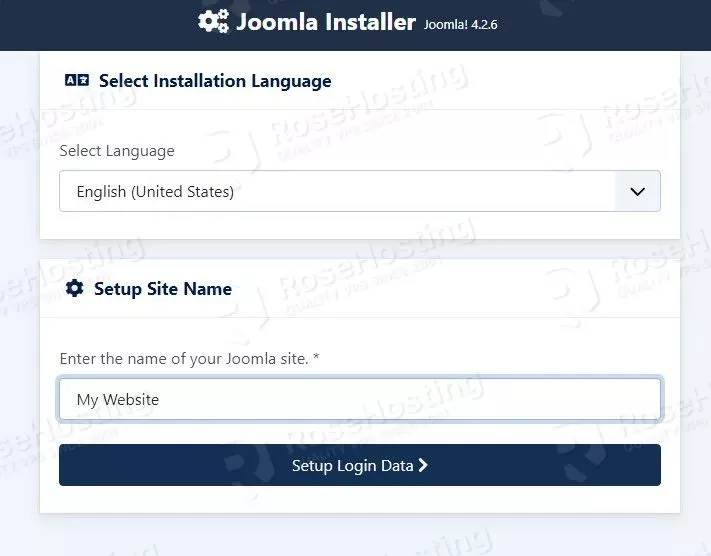
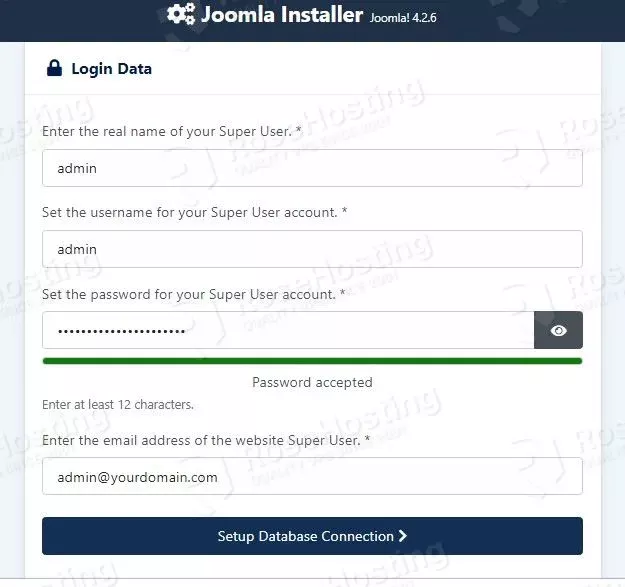
Now you can access Joomla at http://yourdomain.com to finish the installation.
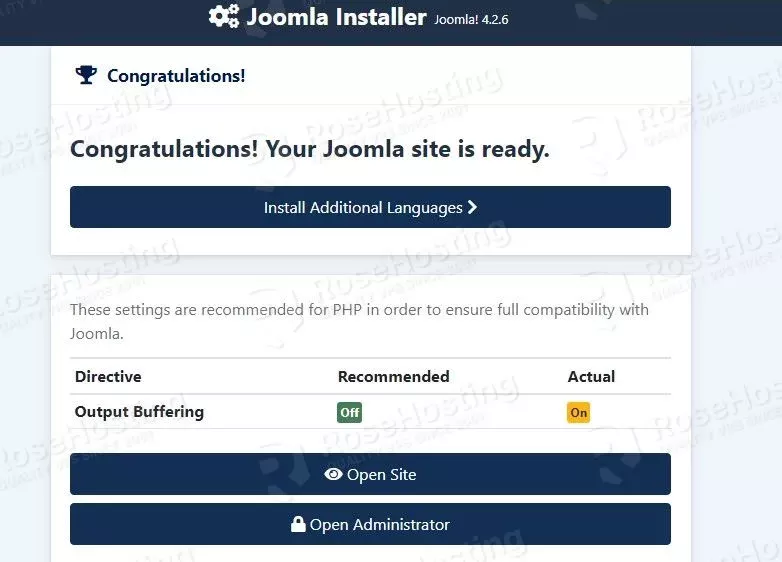
These are the four windows you need to fill in the required information. Please note that you need to enter the database name, database user, and database password you created before.
That’s all. You successfully installed and configured Joomla on AlmaLinux. If you find this setup difficult, you do not need to install it yourself. You just need to sign up for one of our NVMe VPS hosting plans and submit a support ticket. Our admins are available 24/7 via live chat and support tickets. They will help you with any aspect of this setup.
If you liked this about installing Joomla on AlmaLinux, please share it with your friends on social networks or leave a reply below.


