We’ll show you, how to install osCommerce on Debian 8. Imagine a situation in which you have a great product to sell and an already planned marketing campaign, but the one thing missing is an eCommerce website to sell your product from. Of course you’ve made your due diligence and instead of being clear on which eCommerce platform you should use, you are even more confused by the number of available and possible eCommerce solutions out there. Magento, OpenCart, CS Cart, Prestashop… where does it end? Although every one mentioned is a great eCommerce solution by it’s own standards, in this tutorial we will focus on installing the lightweight and less server intensive Open Source Commerce (osCommerce) on a Debian 8 VPS.
osCommerce is a complete self-hosted online store solution that contains both a catalog frontend and an administration tool backend which can be easily installed and configured through a web-based installation procedure.
It can be used on any web server with PHP and MySQL installed and it allows you to setup and maintain e-stores very easily with almost no effort.
Table of Contents
1. REQUIREMENTS
We will be using our SSD 1 Linux VPS hosting plan for this tutorial. We assume that you already have Apache, MySQL and PHP installed and configured on your server. If that is not the case, you can follow our great tutorial and install the LAMP stack easily.
2. LOG IN TO YOUR SERVER VIA SSH
# ssh root@server_ip
You can check whether you have the proper Debian version installed on your server with the following command:
# lsb_release -a
You should get this output:
Distributor ID: Debian
Description:    Debian GNU/Linux 8.3 (jessie)
Release:        8.3
Codename:       jessie
3. UPDATE THE SYSTEM
Make sure your server is fully up to date using:
# apt-get update && apt-get upgrade
Now create a database that will be needed for the osCommerce installation. Log into MySQL as root and execute the below queries:
# mysql -u root -p

mysql> CREATE DATABASE oscommerce;
Query OK, 1 row affected (0.00 sec)

mysql> GRANT ALL PRIVILEGES on oscommerce.* to oscommerceuser@localhost identified by 'your_password';
Query OK, 0 rows affected (0.00 sec)

mysql> FLUSH PRIVILEGES;
Query OK, 0 rows affected (0.00 sec)

mysql> quit;
Bye
4. INSTALL OSCOMMERCE
Navigate to Apache’s default document root ( /var/www/html/ ) and download the latest osCommerce version (during the writing of this article the latest version is 2.3.4) :
# cd /var/www/html/

# wget http://www.oscommerce.com/files/oscommerce-2.3.4.zip
Unzip the archive:
# unzip oscommerce-2.3.4.zip
Rename the unpacked directory:
# mv oscommerce-2.3.4/ oscommerce/
Give appropriate permissions to the below files so your web server can save the installation parameters accordingly. Execute the following commands:
# chmod 777 /var/www/html/oscommerce/catalog/includes/configure.php

# chmod 777 /var/www/html/oscommerce/catalog/admin/includes/configure.php
5. Continue the installation in web broweser
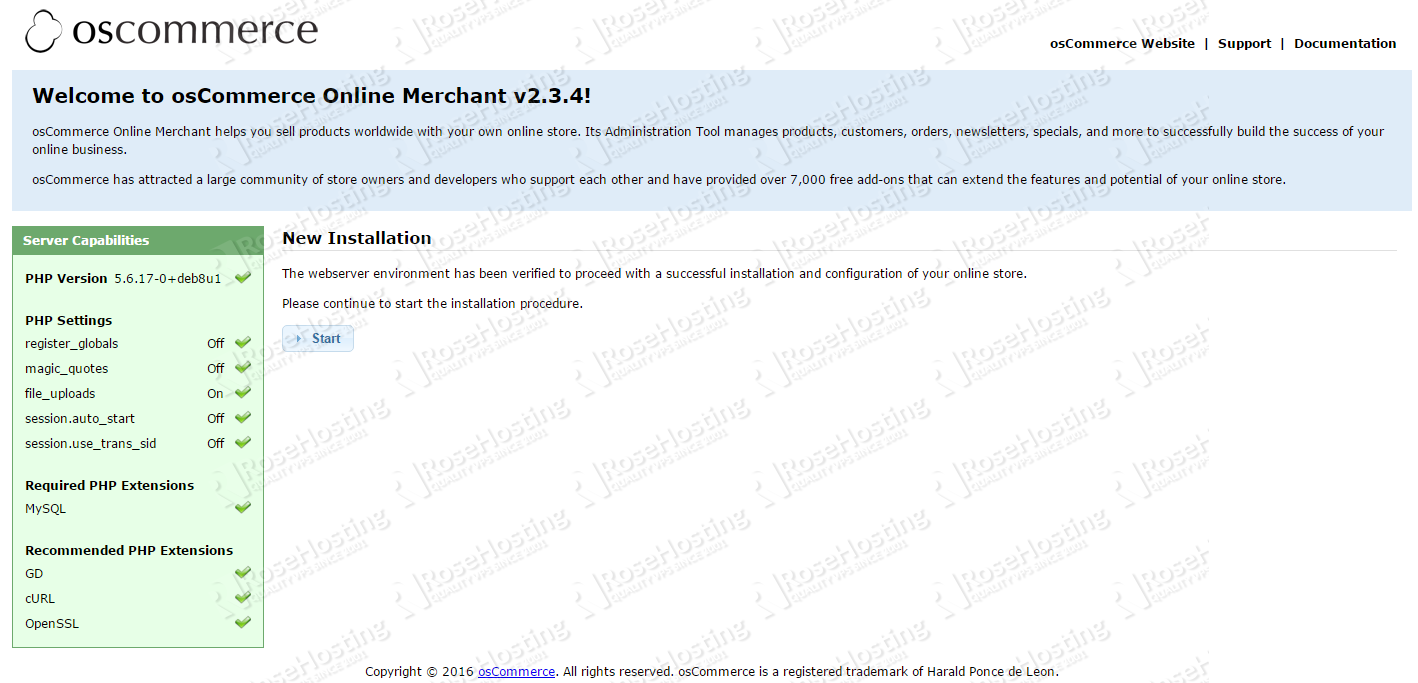
Now open your favorite web browser and navigate to: http://your_IP_address/oscommerce/catalog/install/index.php . You will be welcomed by the osCommerce installation page as shown in the picture below:
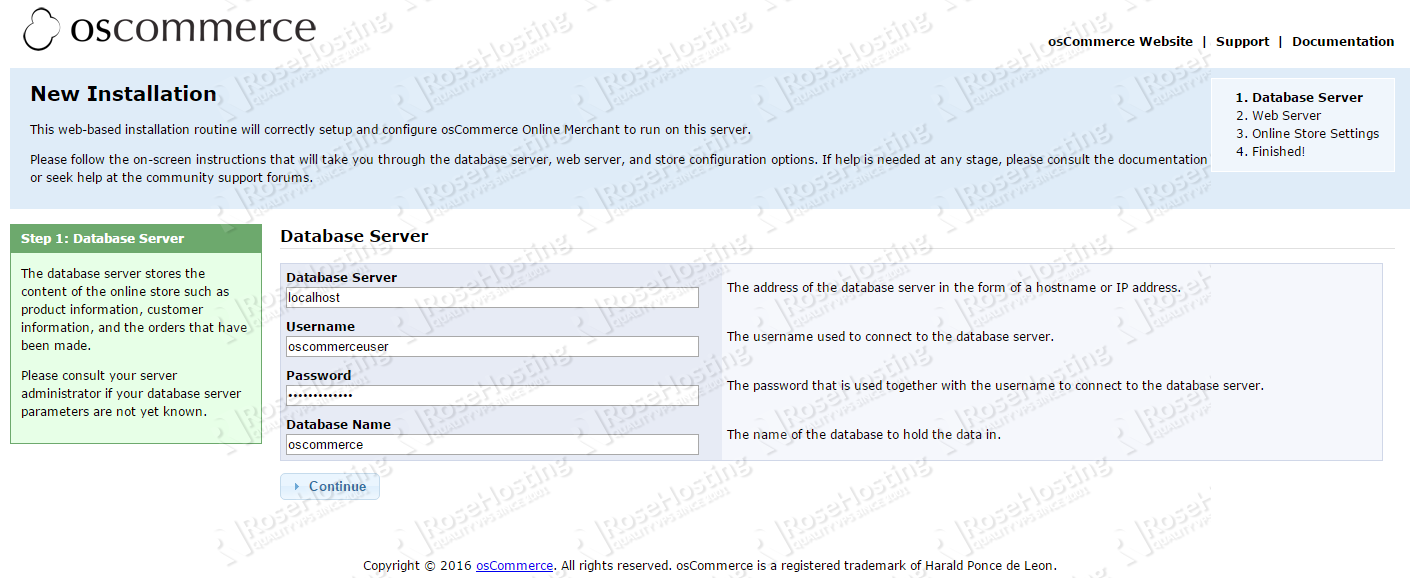
Of course the PHP settings and required PHP extensions need to be enabled/installed so you can proceed with the installation. If everything is OK, click on Start to proceed with the installation. Next are the database settings. Enter the database credentials which if you followed our instructions in the database creation part should be as the ones in the below image:
Next, a page where you can configure your store settings will be opened. Fill the fields according to your needs and finish the installation.
Your store can be accessed at: http://your_server_IP/oscommerce/catalog/index.php and the osCommerce administration backend at: http://your_server_IP/oscommerce/catalog/admin/login.php
You are probably noticing the post-installation notes which say that you should delete the install directory, set correct permissions on some files and protect the administration tool. Execute the underneath commands:
# rm -rf /var/www/html/oscommerce/catalog/install/

# chmod 644 /var/www/html/oscommerce/catalog/includes/configure.php

# chmod 644 /var/www/html/oscommerce/catalog/admin/includes/configure.php
Now let’s password protect the osCommerce administration tool with the htpasswd utility. Execute:
# htpasswd -c /var/www/html/oscommerce/catalog/admin/.htpasswd your_user
You will now be prompted to enter a password, twice. After you enter the password you can check whether the credentials have been entered as expected:
# cat /var/www/html/oscommerce/catalog/admin/.htpasswd
6. Configure Apache
Now configure your Apache web server to check the .htpasswd file before serving the protected content. Open the Apache’s default config file with your favorite editor. We are using nano:
# nano /etc/apache2/sites-available/000-default.conf
paste the following in the VirtualHost directive:
<Directory "/var/www/html">
        AuthType Basic
        AuthName "Restricted Content"
        AuthUserFile /var/www/html/oscommerce/catalog/admin/.htpasswd
        Require valid-user
</Directory>
Save and close the file. Now restart Apache for the changes to take effect.
# service apache2 restart
You can now open http://your_server_IP/oscommerce/catalog/admin/login.php after which you will be presented with a username and password prompt.
Congratulations, you have successfully installed osCommerce on your Debian 8 VPS.
Of course you don’t have to Install osCommerce on Debian 8, if you use one of our Debian VPS Hosting services, in which case you can simply ask our expert Linux admins to install osCommerce for you.They are available 24×7 and will take care of your request immediately.
PS. If you liked this post, on how to Install osCommerce on Debian 8, please share it with your friends on the social networks using the buttons on the left or simply leave a reply below. Thanks.


